Sunday 28 September 2014

My First Design Team Place.............

I am pleased to announce my very first place on a design team......

Thats right I have earned a place on the design team over at............

Auzz Trinklets N Krafts Blog

I will posting new Mixed Media art every Monday with a few extras every now and then, but here is a sneak peek of my first post:


Head on over to the blog on Monday to check out the entire post.

Until next time.........

Wednesday 10 September 2014

A Little Bit of Altering..........

I had recently come up with the idea to create a top hat using an old book...........well my toddler had other ideas!

I started off with an old book and removed the cover, after finding the exact middle of the book I started folding the pages in towards the centre of the spine, half one way and half the other.

Then after all of this folding and a few very sore fingers, I connected the first and last pages together using Ranger's Glue 'N' Seal (this is my new favourite adhesive.......... even starting to like it better than matte medium).

I started making what was going to be the brim, thats when my 2 year old had other ideas for what I was working on. He had gotten to some of my inks and decided to paint the brim that I was working on a nice shade of green and blue.

I think someone is going to be a artist then they get older and as much as I want to nurture this creative side of him, I don't want him to think that he can make modifications to Mummy's art work!!!

So I scrapped the idea of a top hat and decided to create a Halloween Themed Pedestal!

Here is what I came up with as my final result...........


and a few close up pictures........


I got most of the bits and pieces from my local craft store, and made the broom stick from a twig off a tree in my yard and some jute string. The bottles are from the Tim Holtz ideology collection and are filled with watered down acrylic paint and the small one has black glitter and white glue in it.

I am quite happy with how this turned out........despite it is nothing like what I originally had intended to make.

Enjoy.......


Monday 18 August 2014

New Art Journal Page

It has been a little while since I have had time to create something, between myself being sick and having sick kids I have not had a lot of free time.

But.........all that changed today!

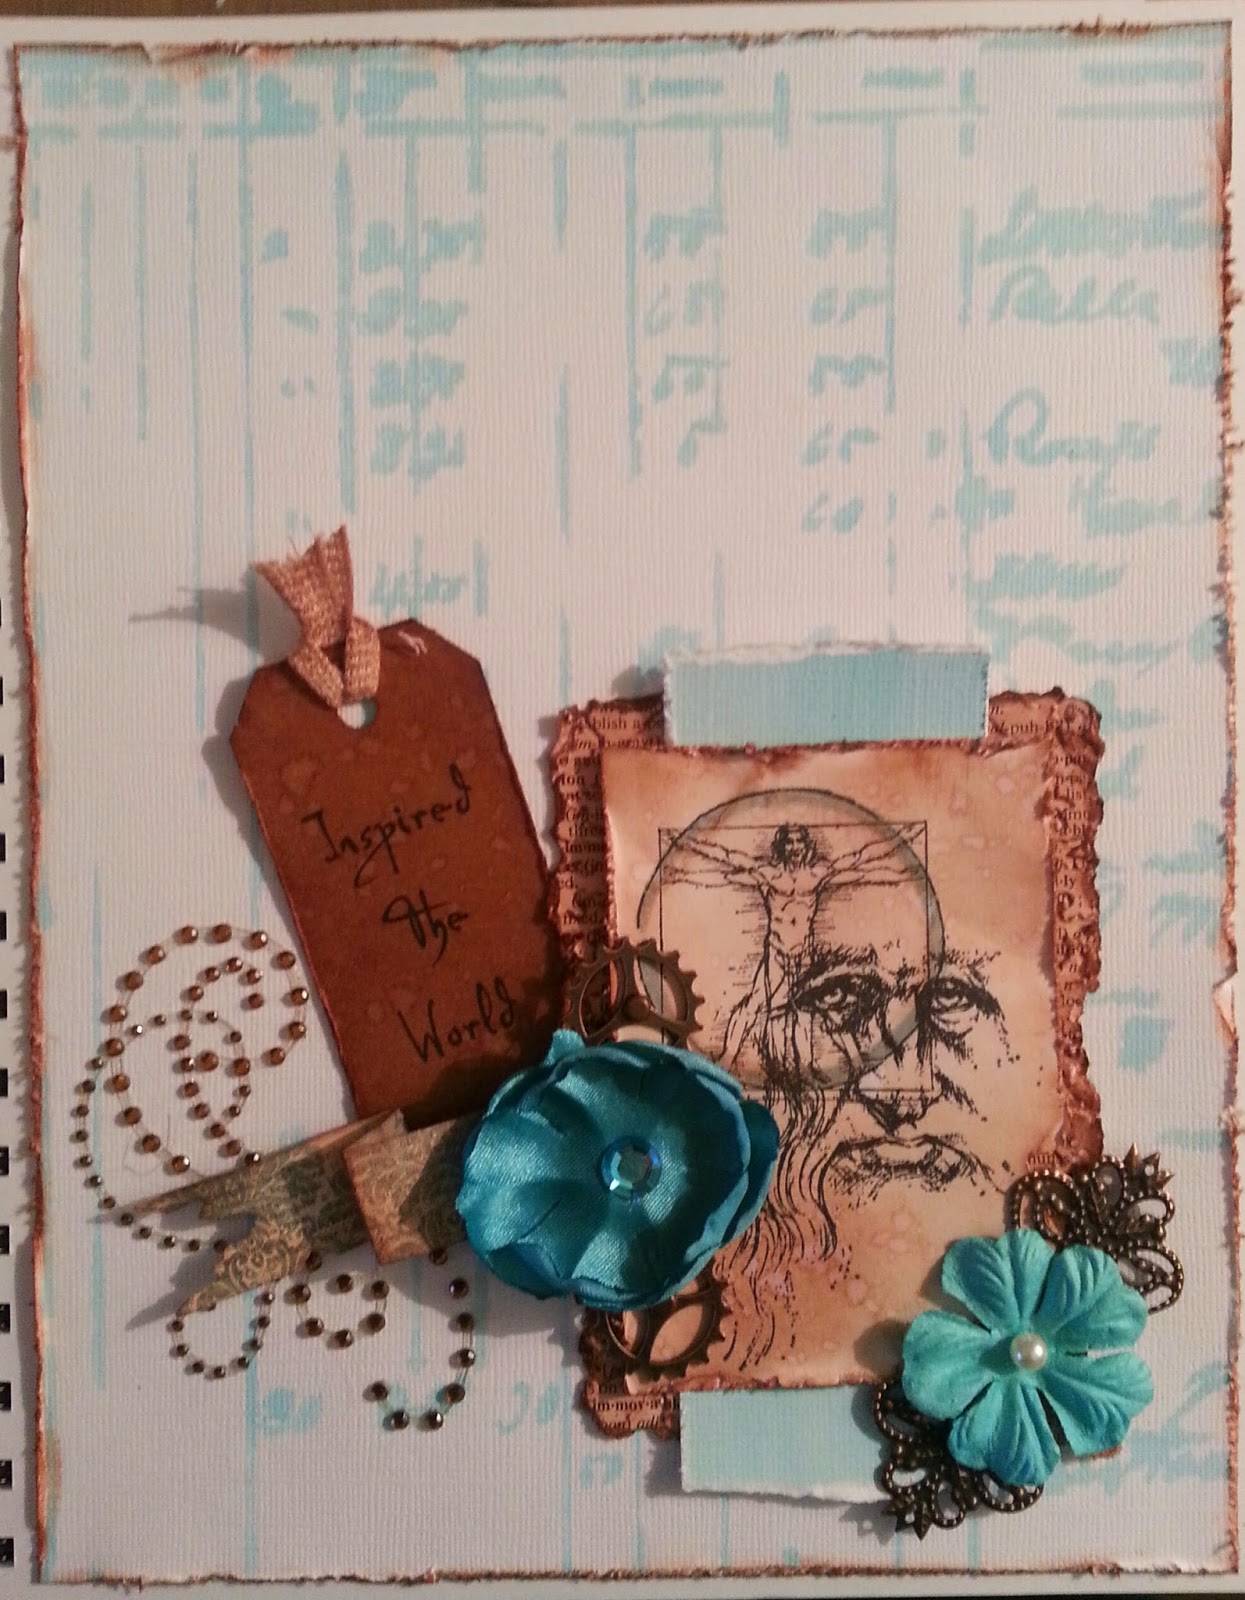
After some much needed tidying of my craft room I managed to sit down and create a page in my art journal. I have changed things around a little as I have been having a lot of trouble finding a journal that can take the weight of all the media that I use and lately I have really liked using lots of embellishments.

Because of this the books I have used tend to become quite bulky and will not hold lots of layers. So I have gotten myself a wire bound sketch book and I am creating my pages on heavy weight cardstock and then mounting them into the sketch book.

So without further ado..............


Materials Used:

- Kaszazz SB Essentials 12x12 Cardstock (White)
- Kaszazz Leonardo Stamp
- Tim Holtz Decorative Strip Die (Tattered Banners)
- Metal Embelishments (Gears and Flourish)
- Distress Ink (Vintage Photo)
- Distress Paint (Tumbled Glass)
- Recollections Flowers (Blue)
- Prima Marketing Gem Flourish
- My Minds Eye Cowboy 6x6 Paper Pad
- Old Book Pages
- Crafter's Workshop 12x12 Stencil (Ledger)
-Kraft Cardstock
-Tim Holtz Tiny Tabs and Tags Die
- Ranger Archival Ink (Black)
- Glossy Accents

This is by no means a complete list of materials as I have a feeling that I have forgotten something, but at this stage I cannot think what it could be.

One last thing before I go, I just have to say that I really love the blue/brown colour combination and I seem to really use it a lot in my artwork.

Well thats all from me for now, keep a look out for another creation very soon!


Friday 25 July 2014

My New Toy!!!!

I have a new little toy in my house at the moment.........


My little MacBook Air, and I am so in love with it already. I have been playing with this little gem for half the day now and I just cannot stop. 

It sure beats my old Acer PC hands down........... (shhhhh! don't tell Acer)

I got it mainly because I needed a faster computer for my Graphic Design stuff, but mostly because I have always wanted one.


This guy was an absolute legend when he came up with this laptop!

Well not much else from me today, I have been hard at work........not really working but I have been showing up!

I have not had much fun on the Artful side of things lately as I just have not had the time, I have however managed to get my challenge blog up and running and the first challenge goes live on August 1st.

Hopefully now that my work hours have been cut back I will have time to create again.


Tuesday 15 July 2014

Tim Holtz 12 Tags of 2014 - July

I am a mad Tim Holtz fan, I mean absolutely obsessed with his products. I have so much stuff by him that not only has most of it never been used, but I am running out of places to store things (I am going to end up being one of those people that dies under fallen piles of stuff that I have hoarded).

Well every month Tim creates a tag that contains techniques that utilize his products beyond what they are originally intended for. Even though I frequent his blog 2-3 times a week looking for inspiration, this is the first time I have created a tag using one of the techniques on his blog.

And........Here it is:


Materials:

- Tim Holtz Movers and Shapers Large Die (Tag & Book Plate)
- PVC Sheet (250 Microns)
- Kraft Cardstock
 - Simplicity Jute String
- Tim Holtz Ideology Swivel Clasps
- Tim Holtz Ideology Monocles
 - Tim Holtz Texture Fade (Blueprint)
- Distress Ink (Walnut Stain)
- Tim Holtz Stampers Anonymous Stamps (Time Travelers CMS157 & Warehouse District CMS124)
- Ranger Archival Ink (Black)
- Distress Markers (Brushed Corduroy & Mustard Seed)
- Ranger Water Brush Detailed Tip
- Papercraft Foam Dots

I am extremely happy with how this tag turned out, and I have decided that I may go back over the previous monthly tags and techniques and try my hand at some of those as well. 

Well thanks for stopping by and hope to see you again very soon.

Saturday 12 July 2014

July Mixed Media Tag Swap - All About Stencils......

I am a member of a nice little group over at Ning called Art and Sassy. Have been a member there for a month or two now and have just finished my first swap (I still need to post it to the swap organiser) 

Every month there is a Mixed Media Tag Swap, this month is.....

All About Stencils!

Here is my creation:


Materials:

- Tim Holtz Movers and Shapers Large Die (Tag & Bookplate)
- Corrogated Cardboard Box
- Heidi Swap 6x6 Lattice Stencil
- Reeves Modeling Paste
- Liquitex Gesso
- Beading Wire
- Tim Holtz Ideology Muse Tokens
- Tim Holtz Ideology Pen Nibs
- Tim Holtz Tiny Attacher
- Zig Glue Pen
- Kraft Cardstock
- Walnut Stain Distress Ink
- Twine

I was aiming for a basic tag with little embelishments and mediums yet still have a good overall effect, hence the reason I used corrogated card (it was actually a box that had one of my son's birthday presents in it, I tend to keep all kinds of boxes)

After finding out that the Tim Holtz Tag Die cuts through corrogated cardboard, and even chipboard, I have realised that my tag making possibilities are endless and will probably never buy another packed of precut tags again.

Hope you like my creation, and stay tuned for more...........


Monday 7 July 2014

Birthday Party........

July 1st was my Son's 2nd Birthday. Despite being a little unwell, I managed to bake a birthday cake.......a very chocolate birthday cake........


Not the best looking cake but boy it tasted great, and my little Birthday Boy enjoyed it too..........


Thursday 19 June 2014

Tutorial - Alcohol Spray Inks

Well as promised in my last post here is the tutorial for making your own.....

.........Alcohol Spray Inks........

What You Will Need:


- Rubbing Alcohol
- Spray Bottles (I use Ranger Mini Misters)
- Distress Reinkers
-Paper Towel
- Gloves to protect your hands.


Firstly put some paper towel down to protect the surface you are working on. Then depending on how big your spray bottles are and how vibrant you want your colours to come out, you will put your desired amount of Distress Reinker Ink into your spray bottles. Like I mentioned I used mini misters so I used 2 eye droppers full of color.


Then carefully fill the remainder of the bottle with rubbing alcohol. Just remember to not fill all the way to the top, or you will get spillage........


And, there you have it......... simple really. The colors I used were:

- Dusty Concord
- Peacock Feathers
- Fired Brick
- Spiced Marmalade
- Mowed Lawn
- Mustard Seed


This is how bright and vibrant they are when sprayed onto watercolour paper. One of the easiest things you can make. 

As an alternative you could use food coloring instead of Distress Reinkers, and for a shimmer effect just add Perfect Pearls or for a cheaper alternative Powdered Eyeshadow.

Well thats all from me for now..............


Wednesday 18 June 2014

Inspiration Journal - Sneak Peak

I have a lot of inspiration on pinterest, lots of boards, and lots of pins......... but sometimes I prefer to have things in hard copy rather than on a computer floating around in cyberspace.

So I have created my own inspiration journal, it is still just a work in progress......

.......but I will post some progress pictures and when it is all finished I can post a tutorial. 

Here is the journal cover, all it is a folder made from the cardboard insert you get with new sheets. 

The inside is a series of hand stiched notebooks that slide into place with hat elastic.


The notebooks are covered with sewing patterns stamped with stamps that match the pattern paper of the cover.

Like I said the journal is still a work in progress, there are still a few more things I would like to do to the journal before it is finished and ready to use.

Stay tuned for updates on this journal and maybe oneday more like it.


Tuesday 17 June 2014

Art Journal Pages.........

I am getting a lot better at this Art Journal / Mixed Media thing. I mean up until recently my work has been a bit mediocre at best, but with practice, persistance, and finnally the right gesso, things haveimproved alot. Not to the point of professionalism but close enough..........

Here are a couple of double spread pages that I have recently completed........ 


So just a short post today, I am working on something really good and I plan to upload a few progress pictures of a new creation.

Also I have a new tutorial to post, about creating your own spray alcohol inks.........

So keep checking back for that one..........

Monday 9 June 2014

Tutorial - How to make Washi Tape

I have a lot (236 rolls to be exact) of washi tape, just a little bit addicted I'd say but really I can stop any time............

Although I do have that much I still find it difficult to find the right tape for the right project, so ............ lets have a look just how easy it is to just make your own.

Here is what I used.....


- Baking Paper
- Double Sided Tape
- Various Patterned Stamps
- Permanent Ink Pads
- Distress Ink Pads
- Decorative Edge Punch 


First you need to stick a length of double sided tape to the shiny side of the baking paper, like the picture above. Make sure you use baking paper and not wax paper as the stamping won't stick to the wax paper.


Then you can cut the paper into strips, this can be done after decorating the strips or before, as you can see I chose to do it before I decorated the strips.

Then using various stamps and inks go crazy......... decorate each strip as much or as little as you like. You can keep the backgrounds plain or as I have done lightly run a distress ink pad over them to create color. 


And here is what I came up with, I even used a border punch on the bottom one. 

Well that's it..........Very Easy, and the sky is the limit with what you can come up with and no one will ever have anything like it!


Saturday 7 June 2014

Tutorial - Inking Tools

Using Distress Inks is becoming much more popular among paper crafters. It adds color, makes pages look weathered and worn, and just adds overall interest to paper crafts.

I have a lot of Distress Inks, and use them on almost every craft piece that I create. The ink blending tools that were created by Tim Holtz are the best way to use the inks, but they can be quite expensive. My local papercraft store sells them for around $7-$8 each. I prefer to have one blending tool for each color because it's just easier to switch between colors rather than change the blending pad every time you want to change colors. 
Picture
So I decided to make my own, and this was very easy and inexpensive.

This is what I used:

- Piece of Pine (1.2m x 49mm x 19mm)
- Sheets of Craft Foam
- Velcro (Hook Only)
- Glossy Accents
This is what they look like when finished.......
Picture
Just basic looking and a little rough, but great for my own personal use. You will notice that the Tim Holtz blending tools have a handle on them and the ones I have made don't, well I don't hold them by the handle anyway so not having one on the blending tools works for me.

Here is a step by step of how I made them:
Picture
1 & 2 - Using my partner's mitre box, ( I was the first to use it, it still had all the packaging on it!) I cut the wood into 1 1/8th inch blocks. After getting a good work out on my right arm from all that manual sawing, I then gently sanded all the edges to both take any sharpness away and to remove any splinters from sawing.

3 - Cut the craft foam into pieces slightly smaller than the wooden blocks and glue them to the blocks (I used glossy accents to adhere the foam to the block but any ind of glue that won't dissolve the foam will do). Then cut the velcro to the same size as the craft foam and adhere this to the foam ( I used self adhesive velcro but again any adhesive that won't dissolve the foam will work).

4 - Attach your blending foam pad and presto finished! I downloaded the labels from the Ranger website and used my Xyron sticker thing to stick the labels to the blocks.

NOTE: The foam pads are slightly larger than the blocks but I don't find that an issue. I took my measurements for the wooden blocks from Ranger Ink Blending Tools.

All up I got about 20 ink blending tools from that length of wood. And my total cost was approximately $10, can't argue with that now can we.........
 
Well that's about it from me for today............ I think that I have gone on long enough!

N.B. No copyright infringement intended - I have tried to make the blocks as little like the original's as possible, this shape is just the easiest to handle for me.

Friday 6 June 2014

My Blog, My Design.........

Welcome one and all to my Blog!

I am here to tell you about an exciting (ummmmm maybe not that exciting) opportunity, and a place where you can come and read all about......

.....ME.....

I know it sounds a little conceited, but seriously I can be interesting, and sometimes I am even fun!

No, but in all seriousness I have created this blog to showcase what I can and even what I cannot do. I am happy to share my achievements and even my failures.

I am not going to waste any time introducing myself, if you want to know who I am, my family and what I do for a living then have a look at the about me page! You may even find out something interesting about me. 

On to the good stuff.....

(as I was putting those full stops in my head was saying DUN, DUN, DUNNNN)

I thought I might start by sharing a list of links as to where you can find the stuff I used to create both my Blog Header and Blog Background. 

Click on each picture to be taken to where you too can purchase them.

itKuPiLLi Imagenarium  - Collage Maker Paper Pack

itKuPiLLi Imagenarium Collage Maker Papers

itKuPiLLi Imagenarium - Collage Maker 2  Kit

itKuPiLLi Imagenarium Collage Maker 2

itKuPiLLi Imagenarium - Still Kit

itKuPiLLi Imagenarium Still

Holliewood Studios - Art Journaling Kit 3

Art Journaling 3

Holliewood Studios - Art Dollies Kit

Art Dollies

All kits were purchased from Deviant Scrap, and there are many talented designers that contribute and collaborate to produce wonderful and affordable kits suitable for any form of digital art! (They even have stuff you can print for Mixed Media)